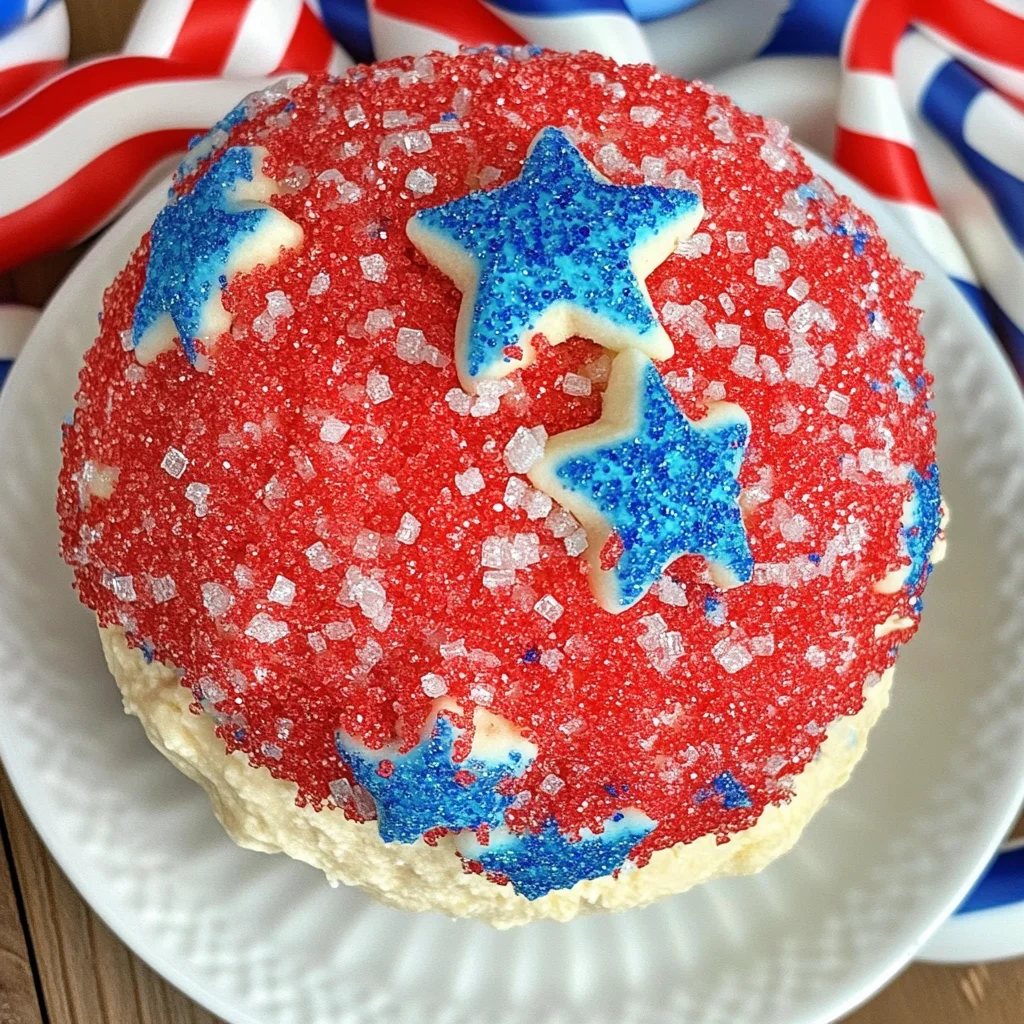
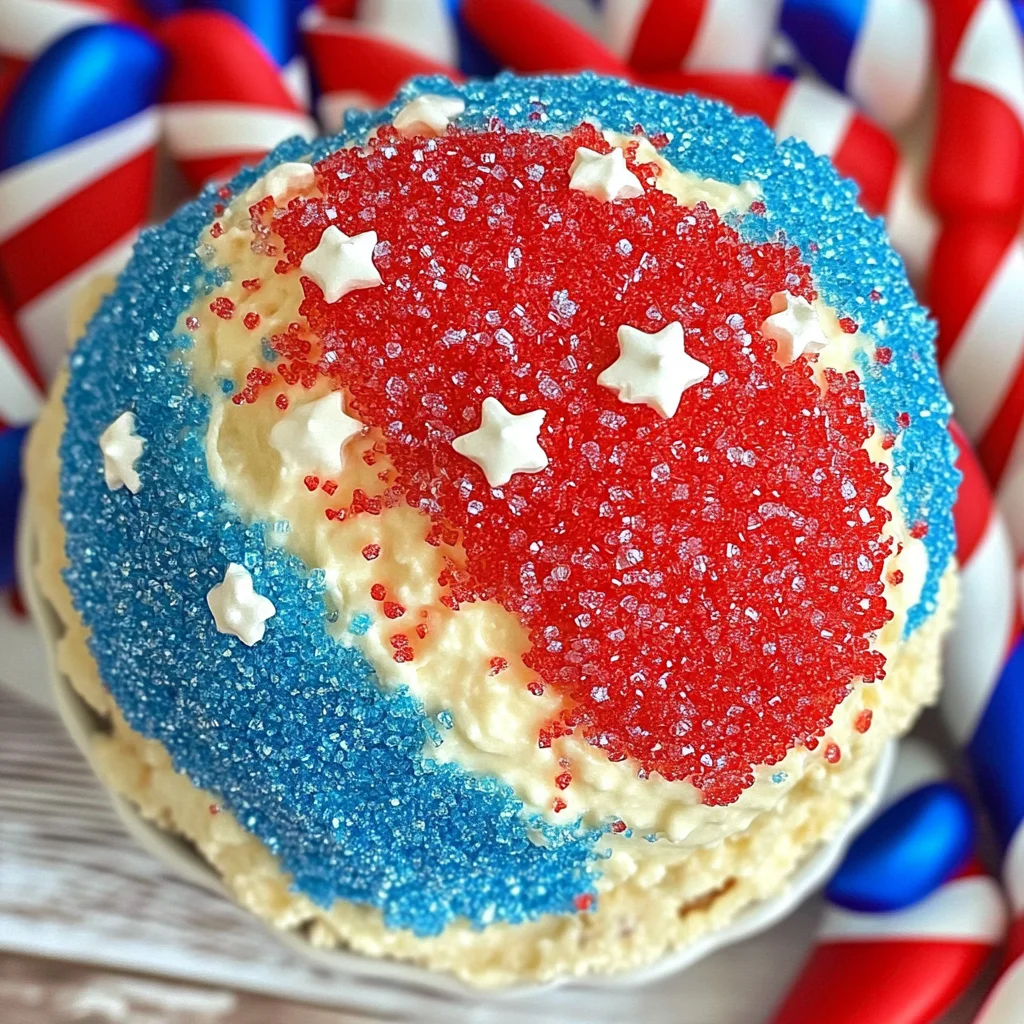
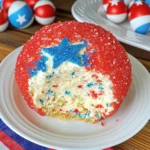
Red White & Blue Golden Oreo Cheese Ball
This Red White & Blue Golden Oreo Cheese Ball is the perfect easy dessert for summer holidays like the 4th of July, Memorial Day, or Labor Day. It’s a fun and festive party dip that brings together delicious flavors in a visually striking presentation. Not only is it simple to make, but its vibrant colors and delightful taste will impress your guests and family alike.
Why You’ll Love This Recipe
- Easy to Prepare: This cheese ball takes just 15 minutes to whip up, making it a quick option for last-minute gatherings.
- Deliciously Sweet Flavor: The combination of golden Oreos, cream cheese, and butter creates a rich and creamy dip that everyone will enjoy.
- Patriotic Presentation: With its red, white, and blue sparkling sugar topping, this dessert is sure to catch the eye at any celebration.
- Versatile Serving Options: Serve it with fruit slices, cookies, or crackers to cater to different tastes and preferences.
- Fun for All Ages: Kids will love helping with the decoration process, making it an engaging activity for family gatherings.
Tools and Preparation
Before you get started on this exciting dessert, gather your tools to ensure a smooth preparation process.
Essential Tools and Equipment
- Food processor
- Mixing bowl
- Mixer
- Plastic wrap
- Wax paper
- Cookie cutter (star-shaped)
Importance of Each Tool
- Food processor: This tool quickly transforms the Oreos into fine crumbs, saving you time and effort.
- Mixer: An electric mixer ensures that your cream cheese mixture becomes perfectly smooth and creamy without any lumps.
Ingredients
For the Cheese Ball
- 15 golden Oreos
- 1 8 oz block of cream cheese (softened)
- 1/4 cup butter (softened)
- 1 cup powdered sugar
- 1 tsp vanilla
For Decoration
- Red, white, and blue sparkling sugar
How to Make Red White & Blue Golden Oreo Cheese Ball
Step 1: Process the Oreos
Place the golden Oreos into a food processor and process until fine crumbs form. Set aside.
Step 2: Mix the Creamy Base
Using a mixer on medium speed, whip together the softened cream cheese and butter until the mixture is smooth and creamy. Slowly mix in the powdered sugar. Add in the vanilla along with the crushed Oreos and mix until fully combined.
Step 3: Shape the Cheese Ball
Line a small bowl with plastic wrap. Place the cream cheese mixture into the plastic-lined bowl. Cover it and refrigerate for at least 2 hours until firm.
Step 4: Create Sections for Sprinkles
Once firm, carefully remove the cheese ball from the bowl. Place it onto a wax paper-lined flat surface. Lightly place a small star-shaped cookie cutter on top of the cheese ball. Use a knife to make small marks on both sides of the cookie cutter to create sections for color changes. Remove the cookie cutter.
Step 5: Add Colorful Sugar
Sprinkle one color of sparkling sugar onto each of the three sections. From left to right, start with red first, then white, then blue.
Step 6: Finish with a Star
Place the star cookie cutter back on top of the cheese ball. Using your chosen color for the star, sprinkle sugar onto the inside of the cookie cutter until covered. Carefully remove the cookie cutter to reveal a beautiful star shape.
Step 7: Serve or Store
Serve immediately or refrigerate until you’re ready to enjoy this festive treat!
How to Serve Red White & Blue Golden Oreo Cheese Ball
Serving the Red White & Blue Golden Oreo Cheese Ball is as fun as making it! This festive dessert is perfect for gatherings, and there are many creative ways to enjoy it.
With Fresh Fruit
- Strawberries: Their bright red color complements the cheese ball beautifully.
- Blueberries: These provide a tasty pop of blue and pair well with the creamy texture.
- Bananas: Slices add a sweet contrast that kids will love.
On a Dessert Platter
- Add Variety: Surround the cheese ball with other treats like cookies or brownies.
- Color Coordination: Use red, white, and blue desserts to enhance the festive theme.
With Graham Crackers
- Crunchy Texture: Graham crackers offer a delightful crunch that balances the creaminess of the cheese ball.
- Fun Shapes: Use star-shaped graham crackers for an extra festive touch.
In Mini Cups
- Single Servings: Scoop portions into mini dessert cups for easy serving.
- Garnish Options: Top with whipped cream or additional sprinkles for added flair.
How to Perfect Red White & Blue Golden Oreo Cheese Ball
To elevate your Red White & Blue Golden Oreo Cheese Ball, consider these helpful tips.
- Use Room Temperature Ingredients: This ensures better mixing and prevents lumps in your cheese ball.
- Chill Longer for Firmness: If you have time, refrigerate overnight for a firmer texture that holds its shape better.
- Experiment with Flavors: Try adding different extracts like almond or lemon to customize the flavor profile.
- Double the Recipe: For larger gatherings, making two cheese balls can ensure everyone gets their fill!
- Decorate Creatively: Use fresh fruit or edible decorations beyond just sprinkles for a unique presentation.
Best Side Dishes for Red White & Blue Golden Oreo Cheese Ball
Pairing side dishes with your Red White & Blue Golden Oreo Cheese Ball can enhance your dessert spread. Here are some great options:
- Patriotic Fruit Salad: Mix strawberries, blueberries, and bananas for a refreshing side that matches the theme.
- Vanilla Ice Cream: A scoop of vanilla ice cream complements the sweetness of the cheese ball perfectly.
- Chocolate-Covered Pretzels: The salty-sweet combination adds a satisfying crunch alongside the creamy dip.
- Mini Cupcakes: Decorate with red, white, and blue frosting for an adorable treat that kids will adore.
- Cheesecake Bites: These rich little bites provide another layer of indulgence for dessert lovers.
- Veggie Tray: Offer fresh vegetables as a light contrast to balance out the sweetness of your cheese ball.
Common Mistakes to Avoid
When making the Red White & Blue Golden Oreo Cheese Ball, avoid these common pitfalls to ensure your dessert turns out perfectly.
- Not softening ingredients: Make sure the cream cheese and butter are softened for easy mixing. If they’re too cold, the mixture will be lumpy.
- Skipping refrigeration: Don’t skip the chilling step! Refrigerating the cheese ball for at least 2 hours helps it firm up, making it easier to shape and serve.
- Over-processing Oreos: Be careful not to over-process the Oreos in the food processor. Aim for fine crumbs without turning them into dust, which can affect the texture.
- Ignoring color layering: Pay attention when sprinkling the colors. Cover each section evenly for a beautiful presentation that showcases the red, white, and blue theme.
- Using incorrect storage methods: Store your cheese ball properly to maintain its freshness. Use an airtight container or wrap it well in plastic wrap before refrigerating.
Storage & Reheating Instructions
Refrigerator Storage
- Store in an airtight container for up to 5 days.
- Wrap tightly with plastic wrap if you don’t have a container.
Freezing Red White & Blue Golden Oreo Cheese Ball
- Freeze for up to 2 months if you want to prepare it ahead of time.
- Wrap tightly in plastic wrap and then place in a freezer-safe bag or container.
Reheating Red White & Blue Golden Oreo Cheese Ball
- Oven: Preheat to 350°F (175°C) and warm for about 10 minutes until slightly soft.
- Microwave: Heat on low power for 15-20 seconds intervals until desired softness is reached.
- Stovetop: Not recommended as this dessert is best served chilled or at room temperature.
Frequently Asked Questions
Here are some common questions about making the Red White & Blue Golden Oreo Cheese Ball.
Can I use different flavors of Oreos?
Yes! You can experiment with other flavors of Oreos for a unique twist on this recipe.
How can I customize my Red White & Blue Golden Oreo Cheese Ball?
Feel free to add your favorite toppings, such as crushed nuts or sprinkles, to make it even more festive.
Is this recipe suitable for kids?
Absolutely! The Red White & Blue Golden Oreo Cheese Ball is a fun and kid-friendly dessert that everyone will enjoy.
How far in advance can I make this cheese ball?
You can make it up to two days in advance. Just keep it refrigerated until you’re ready to serve.
Final Thoughts
The Red White & Blue Golden Oreo Cheese Ball is an easy and delightful dessert perfect for any celebration. Its vibrant colors and creamy texture make it a hit at parties. Don’t hesitate to customize it with your favorite flavors or toppings!
Red White & Blue Golden Oreo Cheese Ball
Indulge in the festive spirit with this easy and delightful Red White & Blue Golden Oreo Cheese Ball, perfect for summer gatherings and celebrations. This vibrant dessert combines the rich flavors of golden Oreos, cream cheese, and butter into a deliciously creamy dip that’s both visually striking and irresistibly tasty. Topped with colorful sparkling sugar, this cheese ball is not only a treat for the taste buds but also a stunning centerpiece for your holiday table.
- Prep Time: 15 minutes
- Cook Time: 0 minutes
- Total Time: 15 minutes
- Yield: About 10 servings 1x
- Category: Dessert
- Method: No bake
- Cuisine: American
Ingredients
- 15 golden Oreos
- 1 block (8 oz) cream cheese (softened)
- 1/4 cup butter (softened)
- 1 cup powdered sugar
- 1 tsp vanilla extract
- Red, white, and blue sparkling sugar for decoration
Instructions
- Process the golden Oreos in a food processor until fine crumbs form.
- In a mixing bowl, beat together softened cream cheese and butter until smooth. Gradually add powdered sugar and vanilla; mix until well combined with Oreo crumbs.
- Shape the mixture into a ball and refrigerate for at least 2 hours to firm up.
- Once firm, shape it on wax paper using a star-shaped cookie cutter as a guide for color sections.
- Sprinkle red, white, and blue sugar onto each section before adding a star on top.
- Serve immediately or store in the refrigerator until ready to enjoy.
Nutrition
- Serving Size: 1 oz (28g)
- Calories: 110
- Sugar: 9g
- Sodium: 60mg
- Fat: 7g
- Saturated Fat: 4g
- Unsaturated Fat: 2g
- Trans Fat: 0g
- Carbohydrates: 11g
- Fiber: 0g
- Protein: 1g
- Cholesterol: 20mg