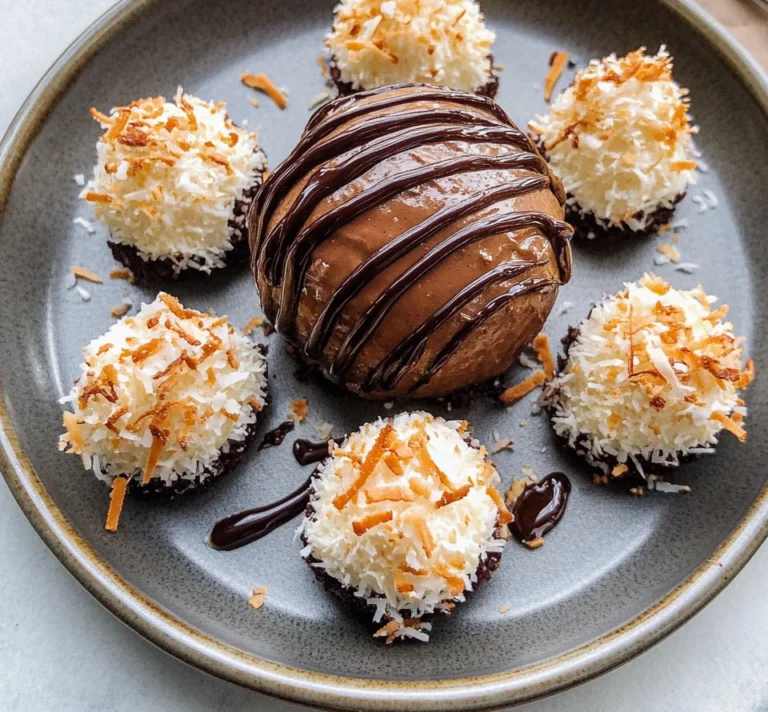
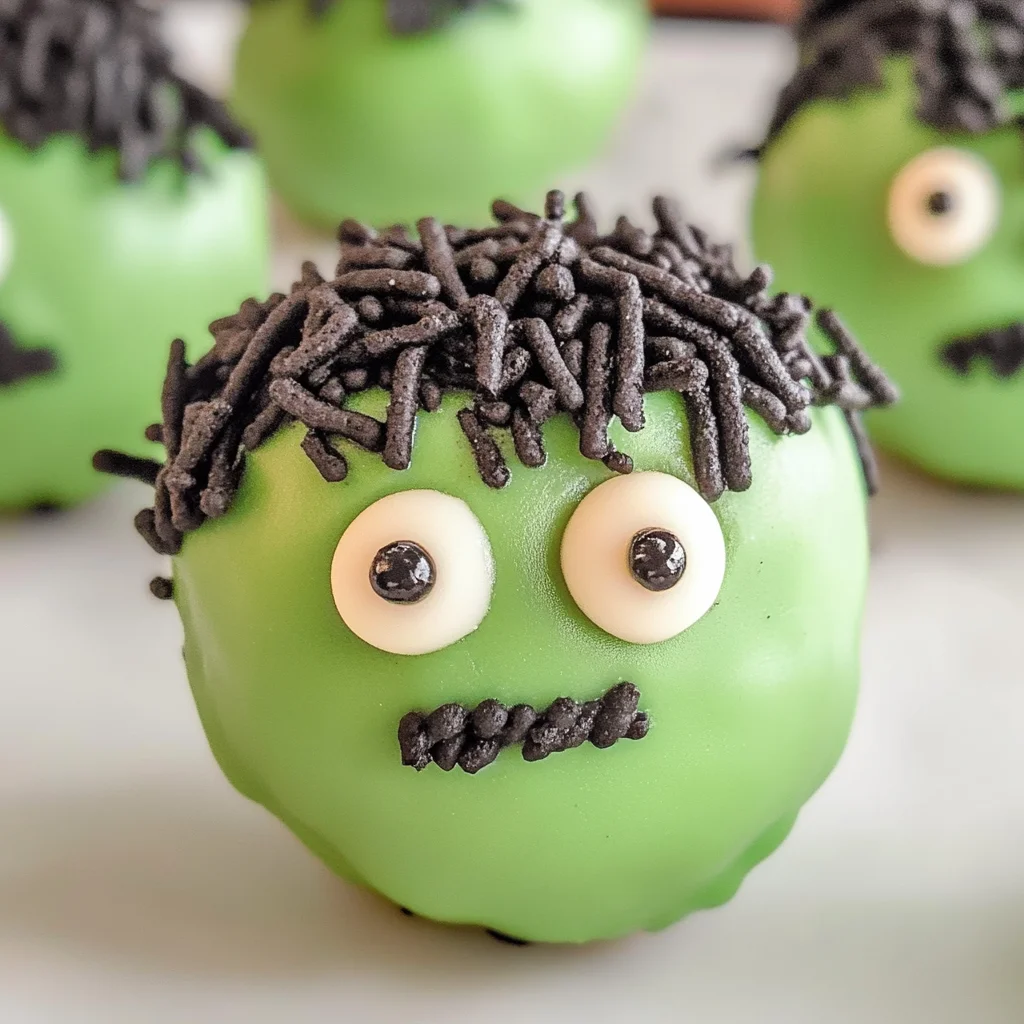
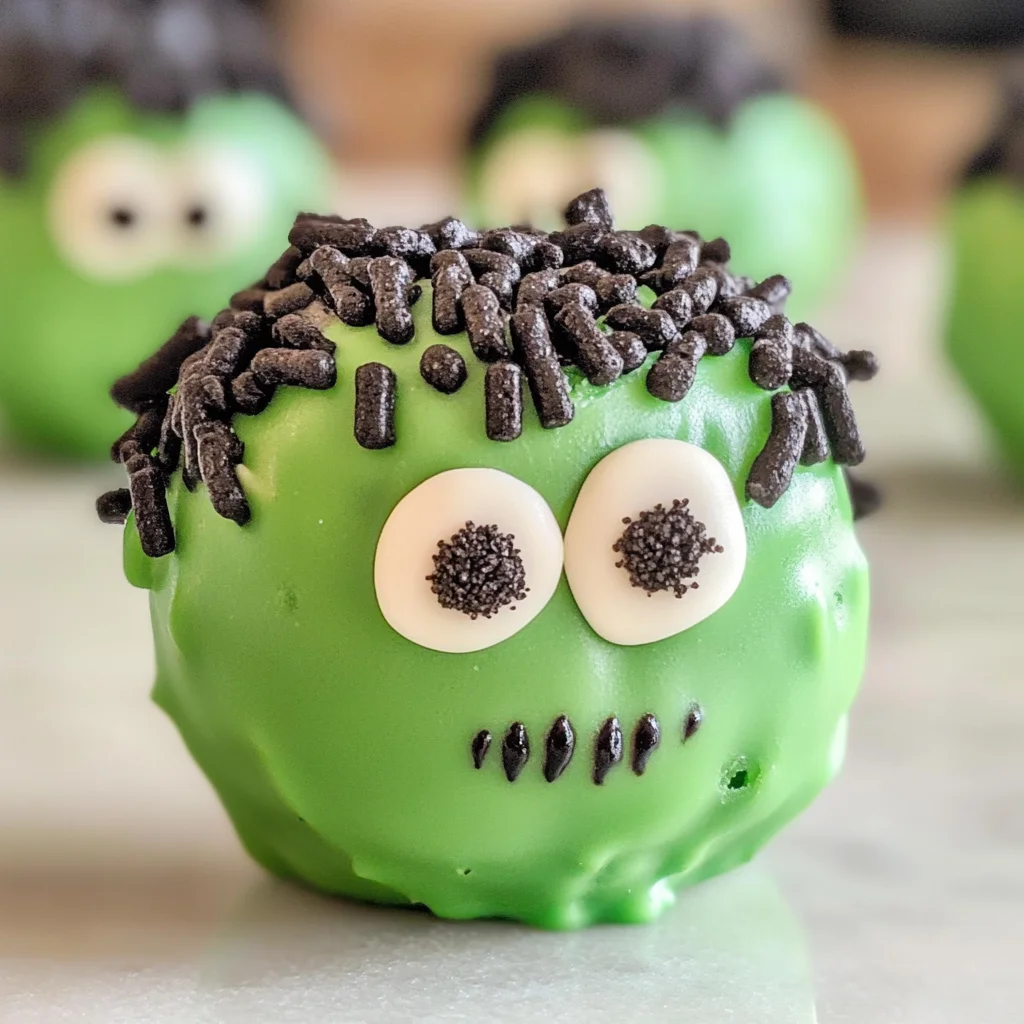
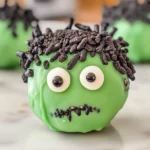
Frankenstein Oreo Balls
Frankenstein Oreo Balls are a fun and festive treat, perfect for Halloween or any spooky gathering. These delightful no-bake treats combine the rich flavors of Oreo cookies with creamy goodness, all dressed up as everyone’s favorite green monster. Easy to make and visually striking, they are sure to impress both kids and adults alike!
Why You’ll Love This Recipe
- Quick and Easy: With no baking required, you can whip up these delicious balls in just a few minutes.
- Creative Presentation: Transform simple Oreo balls into a fun Frankenstein design that adds a festive touch to your celebrations.
- Perfect for Parties: These treats are great for Halloween parties, school events, or any occasion where you want to showcase your culinary creativity.
- Customizable: Feel free to modify the decorations or flavors according to your preferences or dietary needs.
- Kid-Friendly: Kids will love helping with the decorating process, making this a great family activity.
Tools and Preparation
Before diving into this fun recipe, gather your tools. Having everything in place will ensure a smooth cooking experience.
Essential Tools and Equipment
- Mixing bowl
- Electric mixer or stand mixer
- Cookie scoop (2 tablespoons)
- Baking sheet
- Parchment paper
- Microwave-safe bowl
- Forks or dipping tools
- Ziploc bag (sandwich size)
- Scissors
Importance of Each Tool
- Mixing Bowl: A large bowl is essential for combining ingredients evenly without mess.
- Electric Mixer: This tool helps achieve a smooth dough quickly, saving time and effort.
- Cookie Scoop: Ensures uniform sizes for each ball, making them look professional and neat.
- Microwave-Safe Bowl: Perfect for melting chocolate safely without burning it.
Ingredients
To create these delightful Frankenstein Oreo Balls, you will need the following ingredients:
For the Oreo Mixture
- 36 Oreos (finely crushed)
- 8 oz cream cheese (softened at room temperature)
- 1 teaspoon vanilla extract
For the Coating and Decoration
- 2 cups light green melting wafers
- ½ cup black or dark chocolate melting wafers
- 1-½ tablespoons crisco shortening
- Black sprinkles (long not round)
- Pretzel sticks
- Small candy eyes
How to Make Frankenstein Oreo Balls
Step 1: Combine Ingredients
In a large mixing bowl, combine the finely crushed Oreos, softened cream cheese, and vanilla extract. Use an electric mixer to mix for 1-2 minutes until fully combined into a dough-like mixture.
Step 2: Shape the Balls
Using a 2-tablespoon cookie scoop, scoop out the mixture and roll it into smooth balls using your hands. Place each ball on a parchment-lined baking sheet. Use your fingers to flatten the top slightly and shape each ball into a square by pressing down on all sides.
Step 3: Chill the Balls
Refrigerate the cookie sheet with the shaped balls for about 2 hours to allow them to firm up.
Step 4: Prepare Melting Wafers
As chilling time nears its end, melt the light green melting wafers. Place them in a microwave-safe bowl and heat at 50% power for 1 minute. Stir well and add 1 tablespoon of crisco. Heat again in bursts of 30 seconds until smooth.
Step 5: Dip in Chocolate
Using two forks or dipping tools, dip each chilled Oreo square into the melted green chocolate until fully coated. Allow excess chocolate to drip off before placing them back onto the baking sheet.
Step 6: Add Decorations
Immediately sprinkle one side of each square with black sprinkles to create Frankenstein’s hair. Press small candy eyes onto the front of each bite. Break pretzel sticks into about 1-inch lengths and press them into each side for added detail.
Step 7: Pipe on Features
Melt the remaining dark chocolate with crisco as done previously. Transfer it to a Ziploc bag; snip off one corner. Pipe smiles or frowns onto each treat for personality!
Step 8: Final Chill
Chill the decorated Frankenstein bites in the refrigerator for another 30 minutes before serving.
Now you’re ready to enjoy these spooktacular Frankenstein Oreo Balls! Perfectly sweet, fun to make, and even better to share!
How to Serve Frankenstein Oreo Balls
Frankenstein Oreo Balls are a spooky and delightful treat perfect for Halloween gatherings. Whether you’re hosting a party or just looking for a fun dessert, here are some creative serving suggestions.
On a Halloween-Themed Platter
- Arrange the Frankenstein Oreo Balls on a platter decorated with orange and black accents. This creates an inviting display that adds to the festive atmosphere.
With Fun Drink Pairings
- Serve alongside themed drinks like green punch or spooky smoothies. The colors will complement your dessert beautifully, enhancing the Halloween vibe.
As Party Favors
- Place each Frankenstein Oreo Ball in small, clear bags tied with ribbon. These make great take-home treats for your guests to enjoy later.
With Additional Treats
- Pair these treats with other Halloween-themed sweets, like ghost-shaped cookies or pumpkin cupcakes. This creates a fun dessert table that delights both kids and adults.
At a Movie Night
- Serve during a Halloween movie marathon. The fun design of the Oreo balls makes them a perfect snack while enjoying classic horror films.
How to Perfect Frankenstein Oreo Balls
Creating the perfect Frankenstein Oreo Balls requires attention to detail and technique. Here are some tips to ensure they turn out flawlessly.
-
Use Room Temperature Cream Cheese: This helps achieve a smooth mixture when combining ingredients, ensuring easier rolling into balls.
-
Chill Before Dipping: Chilling the formed balls before dipping in chocolate prevents them from losing shape and ensures clean edges.
-
Melt Chocolate Slowly: Heat melting wafers at lower power settings to avoid burning. Stir frequently for even melting.
-
Practice Piping Techniques: Take some time to practice piping chocolate designs on parchment paper before applying it to your treats.
-
Decorate Immediately: Add sprinkles and candy eyes right after dipping, as the chocolate sets quickly. This ensures all decorations stick well.
Best Side Dishes for Frankenstein Oreo Balls
To complement your Frankenstein Oreo Balls at any gathering, consider serving these delightful side dishes. They pair perfectly with sweet treats while keeping the festive spirit alive.
-
Pumpkin Soup: A warm, creamy soup with spices that evokes autumn flavors—perfectly fitting for Halloween.
-
Cheese Platter: A variety of cheeses paired with crackers and fruits can balance out the sweetness of the Oreo balls.
-
Veggie Tray: Offer fresh vegetables like carrots, celery, and bell peppers with a dip; this provides a healthy option among sweets.
-
Mini Sausage Rolls: Bite-sized rolls filled with turkey sausage add savory flavor, offering guests a contrast to the sweet treats.
-
Fruit Skewers: Colorful skewers of seasonal fruit add freshness and vibrant color to your spread while being easy to grab.
-
Popcorn Bar: Set up a popcorn station with different toppings so guests can customize their popcorn; it’s fun and interactive!
-
Spooky Deviled Eggs: Decorate deviled eggs with black olive spiders on top for an eerie yet tasty side dish that fits the theme.
-
Halloween Salad: A mixed greens salad topped with candied nuts and dried cranberries offers a refreshing option amidst desserts.
Common Mistakes to Avoid
When making Frankenstein Oreo Balls, certain pitfalls can diminish your results. Here are some common mistakes to watch out for:
-
Ignoring cream cheese temperature: Using cold cream cheese makes it hard to mix properly. Always soften it at room temperature for a smooth dough.
-
Not chilling the mixture: Skipping the chilling step can result in soft and misshapen balls. Allow them to chill for at least two hours to firm up.
-
Overheating melting wafers: Heating chocolate too quickly can cause it to seize. Always microwave in short bursts at 50% power and stir regularly until smooth.
-
Rushing the decoration: Not allowing the chocolate coating to set before adding decorations can lead to a messy finish. Wait until the coating is slightly firm but not fully hardened.
-
Using the wrong sprinkles: Opting for round sprinkles won’t give you that classic Frankenstein look. Use long black sprinkles for his hair!
-
Forgetting to scrape excess chocolate: Not scraping off excess chocolate from your dipping tool leads to messy balls. Always shake gently side-to-side to remove extra coating.
Storage & Reheating Instructions
Refrigerator Storage
- Store in an airtight container.
- Keep refrigerated for up to 5 days.
- Line layers with parchment paper to prevent sticking.
Freezing Frankenstein Oreo Balls
- Freeze in an airtight container or freezer bag.
- These treats can be frozen for up to 3 months.
- Thaw in the refrigerator before serving.
Reheating Frankenstein Oreo Balls
- Oven: Preheat to low heat (around 200°F) and warm for about 10 minutes, just until soft.
- Microwave: Heat on low power in 5-10 second intervals until warm; do not overheat.
- Stovetop: Place on a non-stick pan over low heat and cover briefly, checking frequently until warmed through.
Frequently Asked Questions
Here are some common questions about making Frankenstein Oreo Balls:
What are Frankenstein Oreo Balls?
Frankenstein Oreo Balls are no-bake treats made with crushed Oreos, cream cheese, and coated with green candy melts, decorated like Frankenstein’s monster.
Can I use different colors for the coating?
Yes! While green is traditional, you can choose any color of melting wafers to customize your Halloween treats.
How do I make these treats vegan?
To make vegan Frankenstein Oreo Balls, use dairy-free cream cheese and check that your melting wafers are free from animal products.
What if I don’t have melting wafers?
You can substitute with chocolate chips; just ensure they are melted properly and add a little shortening if needed for smoothness.
How many servings do these make?
This recipe yields about 18 servings, perfect for sharing during Halloween gatherings or parties!
Final Thoughts
Frankenstein Oreo Balls are a fun and creative treat that’s perfect for Halloween celebrations. Their playful design and delicious flavor will delight both kids and adults alike! You can easily customize them by experimenting with different colors or shapes. Give this recipe a try and enjoy making these spooky goodies!
Frankenstein Oreo Balls
Create spooky yet delicious Frankenstein Oreo Balls that are perfect for Halloween! Easy no-bake recipe everyone will love—try them today!
- Prep Time: 20 minutes
- Cook Time: 0 minutes
- Total Time: 20 minutes
- Yield: Approximately 18 servings 1x
- Category: Dessert
- Method: No-bake
- Cuisine: American
Ingredients
- 36 Oreos (finely crushed)
- 8 oz cream cheese (softened)
- 1 teaspoon vanilla extract
- 2 cups light green melting wafers
- ½ cup black or dark chocolate melting wafers
- 1–½ tablespoons crisco shortening
- Black sprinkles (long)
- Pretzel sticks
- Small candy eyes
Instructions
- In a mixing bowl, mix crushed Oreos, softened cream cheese, and vanilla until well combined.
- Scoop out the mixture using a cookie scoop and roll into smooth balls, then flatten slightly to shape into squares.
- Chill the balls for about 2 hours until firm.
- Melt green melting wafers in a microwave-safe bowl, adding crisco until smooth.
- Dip each chilled square into the melted chocolate, letting excess drip off before placing back on the baking sheet.
- Immediately add black sprinkles for hair and press candy eyes onto each ball.
- Melt dark chocolate with crisco, pipe smiles or frowns onto the treats.
- Chill decorated balls for another 30 minutes before serving.
Nutrition
- Serving Size: 1 serving
- Calories: 150
- Sugar: 12g
- Sodium: 50mg
- Fat: 9g
- Saturated Fat: 4g
- Unsaturated Fat: 5g
- Trans Fat: 0g
- Carbohydrates: 15g
- Fiber: 1g
- Protein: 2g
- Cholesterol: 15mg