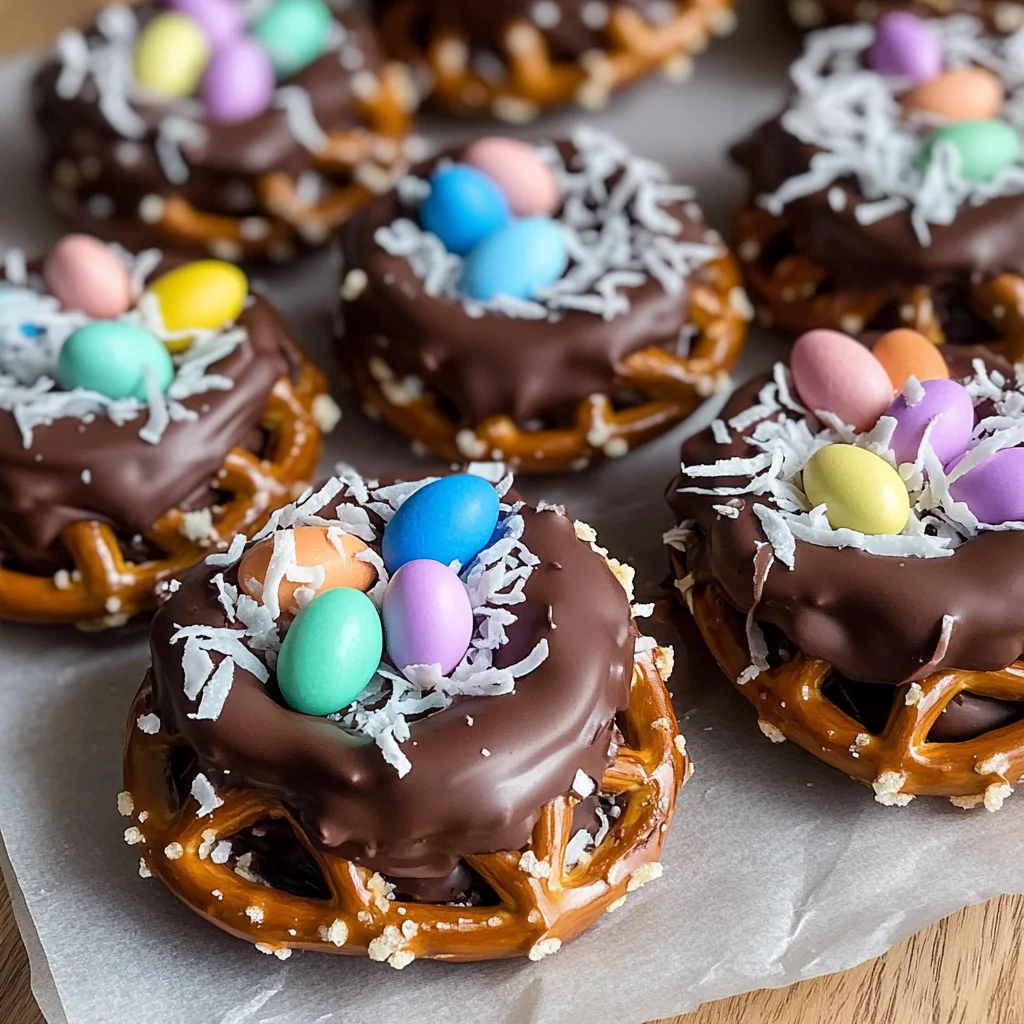
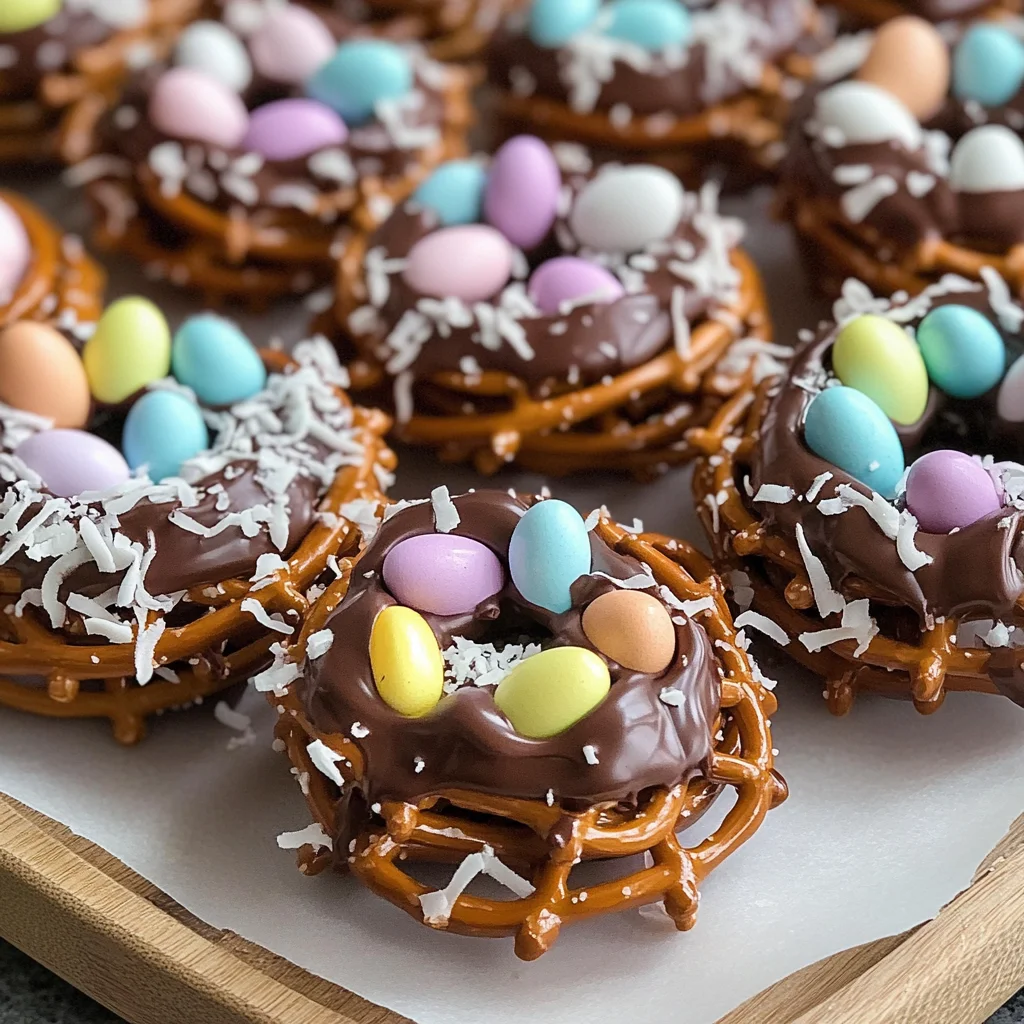
Chocolate-Covered Pretzel Nests
Chocolate-Covered Pretzel Nests are a delightful and festive treat that can enhance any celebration. Their combination of sweet and salty flavors, along with their playful nest-like appearance, makes them perfect for Easter or spring gatherings. Easy to prepare, these treats will surely impress family and friends, bringing joy and smiles to everyone who enjoys them.
Why You’ll Love This Recipe
- Easy to Make: This recipe requires minimal effort and time, making it perfect for busy days or last-minute gatherings.
- Fun for Everyone: Kids and adults alike enjoy shaping the nests and decorating them with colorful candy eggs.
- Customizable Toppings: You can add various toppings like sprinkles or shredded coconut to match your event’s theme or personal taste.
- Sweet and Salty Flavor: The balance of chocolate-covered pretzels with sweet candies creates an irresistible snack.
- Great for Sharing: These nests make a charming centerpiece for dessert tables and are easy to transport to parties.
Tools and Preparation
Before diving into this fun recipe, gather your tools to ensure a smooth preparation process. Having everything ready makes cooking more enjoyable!
Essential Tools and Equipment
- Microwave-safe bowl
- Baking sheet
- Parchment paper
- Spoon or spatula
Importance of Each Tool
- Microwave-safe bowl: Ensures safe melting of chocolate without risk of breaking.
- Baking sheet: Provides a stable base for forming the nests; prevents mess while cooling.
- Parchment paper: Non-stick surface that allows for easy removal of the nests once set.
Ingredients
To create your Chocolate-Covered Pretzel Nests, you will need the following ingredients:
For the Nests
- 4 cups pretzel sticks
- 1 ½ cups milk chocolate chips (or dark/white chocolate)
For Decoration
- 1 cup mini candy eggs (such as Cadbury eggs or jellybeans)
- ½ cup shredded coconut (optional, for a nest effect)
- Sprinkles (optional, for decoration)
How to Make Chocolate-Covered Pretzel Nests
Step 1: Melt the Chocolate
In a microwave-safe bowl, heat chocolate chips in 20-second intervals. Stir between each interval until fully melted.
Step 2: Coat the Pretzels
Add pretzel sticks to the melted chocolate. Toss gently to coat each pretzel evenly with chocolate.
Step 3: Form the Nests
On a lined baking sheet, take small handfuls of coated pretzels. Shape them into nest-like circles by arranging them in a round form.
Step 4: Add Eggs and Toppings
Place mini candy eggs in the center of each nest. If desired, sprinkle with shredded coconut or colorful sprinkles for extra flair.
Step 5: Chill and Set
Refrigerate your creations for 20-30 minutes until the chocolate hardens. Once set, serve your delightful Chocolate-Covered Pretzel Nests and enjoy!
How to Serve Chocolate-Covered Pretzel Nests
Chocolate-Covered Pretzel Nests are delightful treats that can add a fun touch to any gathering. Here are some creative ways to serve these charming snacks.
For a Festive Table
- Arrange nests on a decorative platter for a visually appealing centerpiece.
- Add colorful napkins and spring-themed decorations to enhance the festive atmosphere.
As Party Favors
- Place individual nests in small clear bags tied with ribbon for a sweet takeaway gift.
- Label each bag with a personalized tag for guests to enjoy later.
On an Easter Dessert Board
- Combine with other treats like cookies, candies, and fruit for a vibrant dessert spread.
- Use different sizes of nests to create visual interest on the board.
At Kids’ Parties
- Allow kids to help decorate their own nests with various toppings.
- Offer a variety of candy eggs and sprinkles to encourage creativity.
How to Perfect Chocolate-Covered Pretzel Nests
To make your Chocolate-Covered Pretzel Nests truly stand out, consider these helpful tips.
- Use quality chocolate: Choose high-quality chocolate chips for the best flavor. This will make your nests taste even more delicious.
- Don’t rush the melting: Melt chocolate slowly, stirring well between intervals. This prevents burning and ensures smooth coating.
- Shape them carefully: When forming the nests, work quickly but gently to maintain their shape without breaking the pretzels.
- Chill thoroughly: Give enough time in the refrigerator for the chocolate to fully set. This will keep your nests intact when serving.
- Experiment with toppings: Try different candies, nuts, or even drizzles of contrasting chocolate for added flair.
- Store properly: Keep leftovers in an airtight container at room temperature to maintain freshness and crunch.
Best Side Dishes for Chocolate-Covered Pretzel Nests
Pairing side dishes with your Chocolate-Covered Pretzel Nests can enhance your treat experience. Here are some great options to consider.
- Fruit Platter: Fresh fruits like strawberries, grapes, and oranges offer a refreshing contrast to the sweetness of the pretzels.
- Veggie Sticks with Dip: Carrots, celery, and bell peppers served with hummus provide a crunchy and healthy option alongside sweets.
- Cheese Board: A selection of cheeses adds savory flavors that balance well with the sweet treats, creating a diverse snack spread.
- Mini Sandwiches: Small finger sandwiches filled with turkey or chicken are easy to grab and pair nicely with sweet snacks.
- Popcorn Mix: Create a popcorn mix with nuts and dried fruits for an additional crunch that complements the pretzel nests.
- Chocolate-Covered Fruits: Consider offering dipped strawberries or bananas as an extra indulgent option that mirrors your main treat.
- Trail Mix: A homemade trail mix of nuts, seeds, and dried fruits enhances the flavor profile while providing a healthy crunch.
Common Mistakes to Avoid
Making Chocolate-Covered Pretzel Nests can be fun, but there are common mistakes that can lead to less-than-perfect results. Here’s how to avoid them.
- Incorrect chocolate melting: If you overheat the chocolate, it can become grainy. Melt it slowly in intervals and stir well.
- Not enough coating: Ensure all pretzel sticks are coated evenly with chocolate. Use a large bowl to toss them thoroughly.
- Skipping the chilling step: Allowing the nests to set in the refrigerator is crucial for firm shapes. Don’t skip this step!
- Too many toppings: While toppings add flair, too much can overwhelm the nests. Stick with a few carefully chosen decorations.
- Using stale pretzels: Fresh pretzels make a big difference in taste and texture. Always check the freshness before starting.
Storage & Reheating Instructions
Refrigerator Storage
- Store Chocolate-Covered Pretzel Nests in an airtight container.
- Keep them in the refrigerator for up to one week for optimal freshness.
Freezing Chocolate-Covered Pretzel Nests
- You can freeze these treats for up to two months.
- Use freezer-safe containers or zip-top bags for best results.
Reheating Chocolate-Covered Pretzel Nests
- Oven: Preheat to 350°F (175°C). Place nests on a baking sheet for about 5 minutes, just until warm.
- Microwave: Heat on low power for about 10-15 seconds. Be careful not to melt the chocolate further.
- Stovetop: Avoid this method as direct heat can ruin the nests.
Frequently Asked Questions
Here are some common questions about making Chocolate-Covered Pretzel Nests.
What are Chocolate-Covered Pretzel Nests?
Chocolate-Covered Pretzel Nests are delightful snacks made by coating pretzels in melted chocolate and shaping them into nest forms, often filled with mini candy eggs.
How long do Chocolate-Covered Pretzel Nests last?
When stored properly, these treats last up to one week in the refrigerator and up to two months if frozen.
Can I customize my Chocolate-Covered Pretzel Nests?
Yes! You can use different types of chocolate or toppings like nuts, sprinkles, or dried fruit to create your unique variation.
Are Chocolate-Covered Pretzel Nests suitable for kids?
Absolutely! They are easy and fun to make, making them a perfect activity for kids during spring celebrations or holidays.
How do I get my nests to hold their shape?
Ensure you chill them adequately after shaping. This helps the chocolate harden and keeps your nests intact.
Final Thoughts
Chocolate-Covered Pretzel Nests are not only visually appealing but also provide a delicious blend of sweet and salty flavors. They’re versatile; feel free to customize with various chocolates or toppings. Give this fun recipe a try, and enjoy creating delightful treats that will impress friends and family!
Chocolate-Covered Pretzel Nests

Chocolate-Covered Pretzel Nests are a whimsical and delicious treat that perfectly blend sweet and salty flavors, making them a fantastic addition to any celebration. These charming snacks are not only visually appealing but also incredibly easy to make, making them ideal for both kids and adults. Shaped like nests, they’re perfect for spring gatherings or festive occasions, and can be customized with various toppings to match your theme. With minimal ingredients and straightforward preparation steps, these treats promise to bring joy and smiles to all who indulge in them.
- Prep Time: 15 minutes
- Cook Time: 0 minutes
- Total Time: 15 minutes
- Yield: Approximately 12 servings 1x
- Category: Dessert
- Method: No-bake
- Cuisine: American
Ingredients
- 4 cups pretzel sticks
- 1 ½ cups milk chocolate chips (or dark/white chocolate)
- 1 cup mini candy eggs
- ½ cup shredded coconut (optional)
- Sprinkles (optional)
Instructions
- Melt the chocolate chips in a microwave-safe bowl in 20-second intervals, stirring well until smooth.
- Coat pretzel sticks in the melted chocolate, ensuring they are evenly covered.
- On a lined baking sheet, shape small handfuls of coated pretzels into nest-like circles.
- Add mini candy eggs in the center of each nest and top with shredded coconut or sprinkles if desired.
- Refrigerate for 20-30 minutes until the chocolate sets.
Nutrition
- Serving Size: 1 nest (30g)
- Calories: 130
- Sugar: 10g
- Sodium: 100mg
- Fat: 6g
- Saturated Fat: 3g
- Unsaturated Fat: 3g
- Trans Fat: 0g
- Carbohydrates: 18g
- Fiber: 1g
- Protein: 1g
- Cholesterol: 0mg