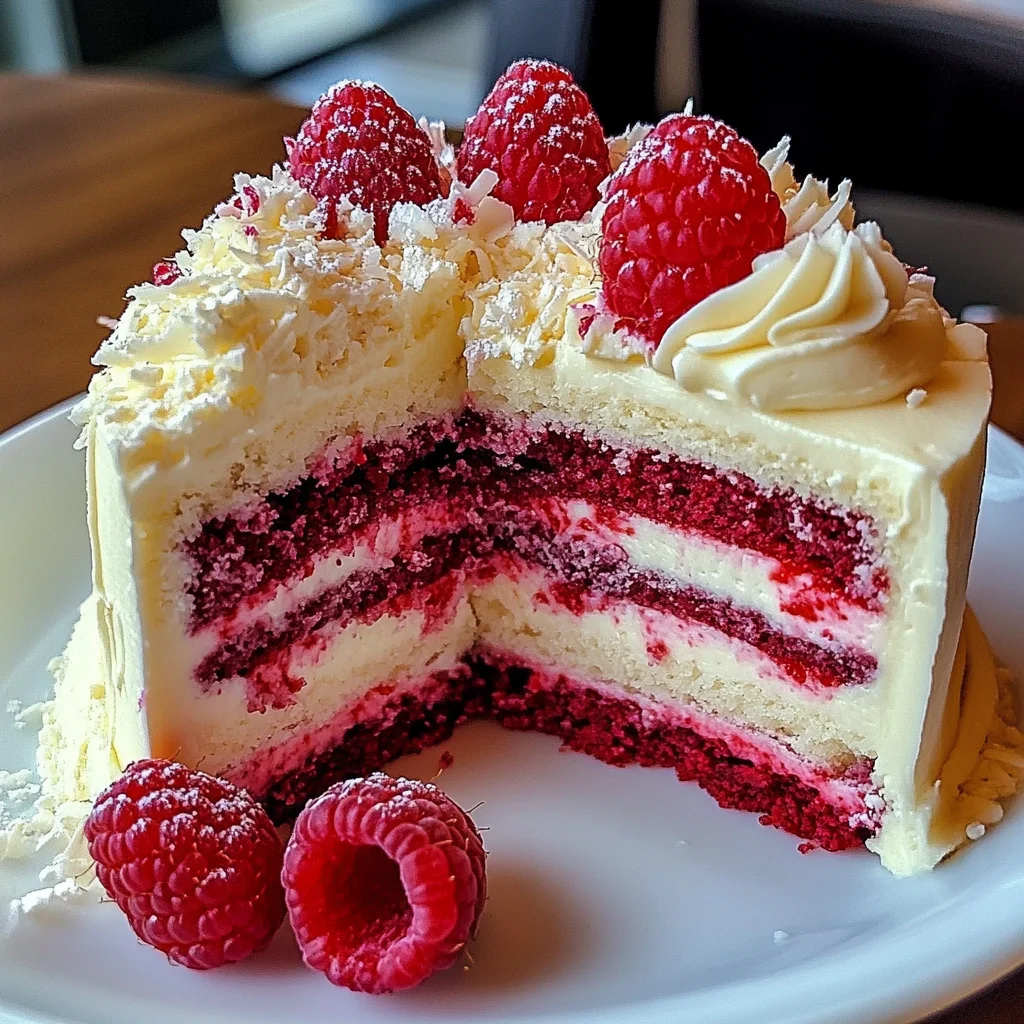
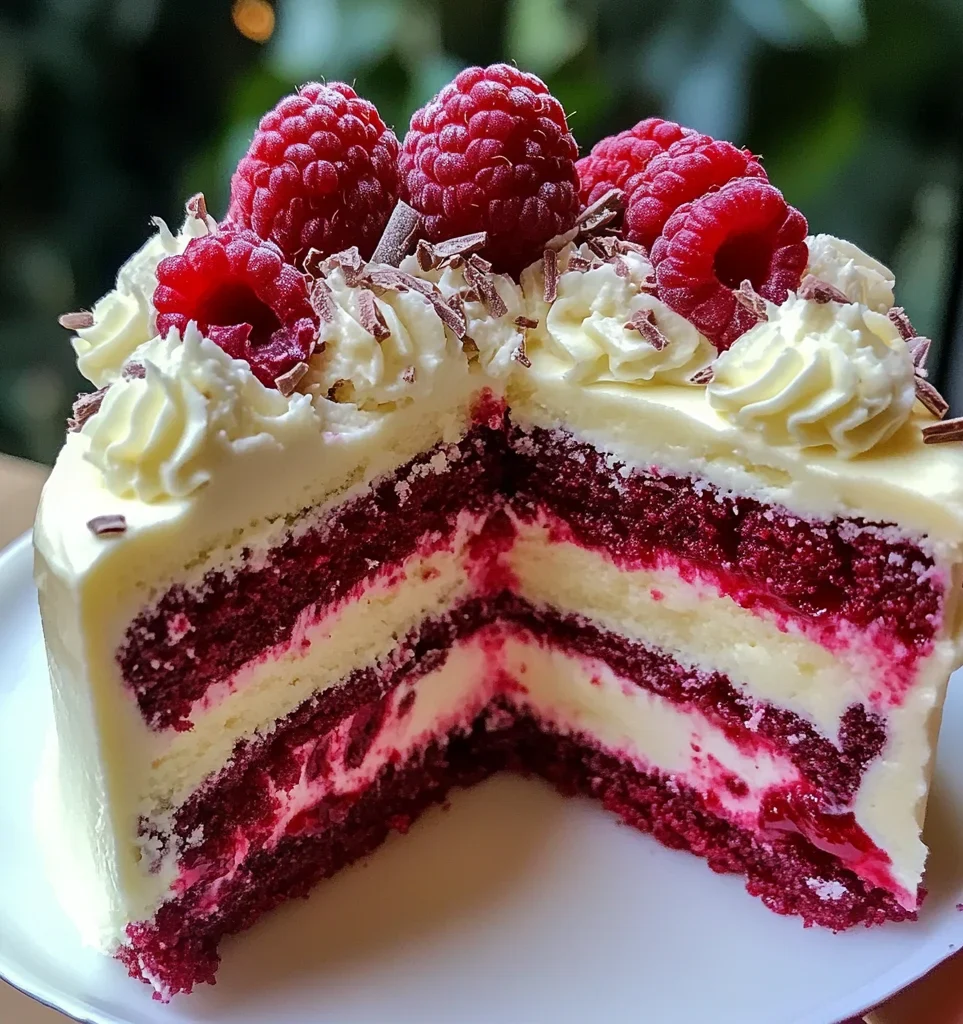
White Chocolate Raspberry Dream Cake – Sweet Easy Recipes Style
There’s something truly enchanting about the combination of white chocolate and raspberries in a fluffy, creamy cake. This White Chocolate Raspberry Dream Cake – Sweet Easy Recipes Style is perfect for any occasion, from brunches to celebrations. Its unique pairing of tartness and sweetness creates a delightful experience with every bite, making it a standout dessert that impresses without requiring advanced baking skills.
Why You’ll Love This Recipe
- Delicious Flavor Combination: The balance of creamy white chocolate and fresh raspberries creates a taste sensation that delights the palate.
- Easy to Make: With simple steps and common ingredients, even novice bakers can successfully create this stunning cake.
- Versatile for Occasions: Perfect for birthdays, brunches, or just because—this cake fits any celebration or casual gathering.
- Beautiful Presentation: Garnished with white chocolate shavings and fresh raspberries, it’s as visually appealing as it is delicious.
- Light Yet Indulgent: The cake strikes a perfect balance between being rich and refreshing, making it suitable for any dessert lover.
Tools and Preparation
Before you dive into baking, gather your tools. Having everything prepared will make the process smoother and more enjoyable.
Essential Tools and Equipment
- 2 9-inch round cake pans
- Mixing bowls
- Whisk
- Spatula
- Electric mixer
- Measuring cups and spoons
- Cooling rack
Importance of Each Tool
- Mixing bowls: Necessary for combining ingredients efficiently.
- Electric mixer: Saves time and effort when creaming butter and sugar together until fluffy.
- Cooling rack: Helps cool the cakes evenly after baking, preventing sogginess.
Ingredients
For the Cake Batter
- 2 1/2 cups all-purpose flour
- 2 tsp baking powder
- 1/2 tsp baking soda
- 1/2 tsp salt
- 3/4 cup unsalted butter, softened
- 1 3/4 cups granulated sugar
- 4 large eggs
- 1 tsp vanilla extract
- 1 cup buttermilk
- 1/2 cup sour cream
- 1/2 cup white chocolate chips (melted)
- 1 1/2 cups raspberries (fresh or frozen)
For Garnishing
- White chocolate shavings
- Fresh raspberries
How to Make White Chocolate Raspberry Dream Cake – Sweet Easy Recipes Style
Step 1: Preheat the Oven
Preheat your oven to 350°F (175°C). Grease and line your two 9-inch cake pans with parchment paper.
Step 2: Prepare Dry Ingredients
In a large bowl:
1. Whisk together the flour, baking powder, baking soda, and salt until well combined. Set aside.
Step 3: Cream Butter and Sugar
In another bowl:
1. Cream the softened butter and granulated sugar together using an electric mixer until light and fluffy.
2. Add the eggs one at a time, mixing well after each addition.
3. Stir in the vanilla extract.
Step 4: Combine Wet Ingredients
Add the buttermilk, sour cream, and melted white chocolate to the butter mixture:
– Mix until all ingredients are well combined.
Step 5: Incorporate Dry Ingredients
Gradually add the dry mixture to the wet ingredients:
– Mix just until incorporated; do not over-mix.
Step 6: Fold in Raspberries
Gently fold in the raspberries with a spatula:
– Don’t worry if some break apart; this adds to the flavor!
Step 7: Bake
Divide the batter evenly between the prepared pans:
– Bake for 25–30 minutes or until a toothpick inserted into the center comes out clean.
Step 8: Cool Cakes
Let cakes cool in their pans for about 10 minutes:
– Then turn them out onto wire racks to cool completely.
Step 9: Frosting & Serving
Once cooled:
– Frost layers with your favorite frosting (such as whipped cream or cream cheese frosting), then garnish with white chocolate shavings and additional raspberries. Slice and serve!
Enjoy your delightful creation! This White Chocolate Raspberry Dream Cake is sure to be a hit at any gathering!
How to Serve White Chocolate Raspberry Dream Cake – Sweet Easy Recipes Style
Serving your White Chocolate Raspberry Dream Cake can elevate any occasion. Whether it’s a birthday party, brunch, or just a delightful dessert after dinner, presenting this cake beautifully makes it even more special.
Classic Slice
- Serve a generous slice of the cake on a dessert plate. This is perfect for showcasing the layers and garnishes.
Individual Servings
- Cut the cake into small squares and serve them on mini plates. These bite-sized pieces are great for parties or gatherings.
With Fresh Berries
- Add a side of fresh raspberries on each plate. The tartness complements the sweetness of the cake beautifully.
Accompanied by Whipped Cream
- Offer a dollop of whipped cream next to the slice. The light texture balances the richness of the cake.
Drizzled with Fruit Sauce
- Create a raspberry sauce using pureed raspberries and drizzle it over the cake for an extra burst of flavor.
Garnished with Mint Leaves
- Place a few fresh mint leaves on top as garnish. This adds color and a refreshing aroma to each serving.
How to Perfect White Chocolate Raspberry Dream Cake – Sweet Easy Recipes Style
Perfecting your White Chocolate Raspberry Dream Cake is all about attention to detail. Follow these tips to ensure your cake turns out amazing every time.
- Use Room Temperature Ingredients: Ensure eggs, butter, and buttermilk are at room temperature for better mixing and fluffiness.
- Don’t Overmix: Mix just until combined when adding dry ingredients to keep your cake light and airy.
- Fresh Raspberries: Opt for fresh raspberries if possible; they offer better flavor compared to frozen ones.
- Check Doneness Early: Start checking your cake five minutes before the suggested baking time to avoid overbaking.
- Cool Completely: Allow cakes to cool completely before frosting; this prevents melting and sliding of the frosting.
- Store Properly: Keep leftover cake in an airtight container at room temperature for up to three days for best taste.
Best Side Dishes for White Chocolate Raspberry Dream Cake – Sweet Easy Recipes Style
Pairing your White Chocolate Raspberry Dream Cake with complementary side dishes can enhance your dessert experience. Here are some excellent choices:
- Vanilla Ice Cream: A classic pairing that adds creaminess and balances sweetness.
- Fruit Salad: A mix of seasonal fruits provides freshness that cuts through richness.
- Chocolate Mousse: Rich and silky chocolate mousse creates a decadent contrast against the sweet cake.
- Lemon Sorbet: The tartness of lemon sorbet cleanses the palate between bites of cake.
- Cheese Platter: A selection of mild cheeses offers a savory counterpoint to the sweet flavors.
- Coconut Whipped Cream: Light and dairy-free, coconut whipped cream adds tropical flair without overpowering the cake’s flavors.
- Almond Biscotti: Crunchy biscotti adds texture alongside soft slices of cake, perfect for dipping in coffee or tea.
- Chia Seed Pudding: This healthy option with its creamy texture complements the richness of the cake while adding nutrition.
Common Mistakes to Avoid
Making the perfect White Chocolate Raspberry Dream Cake can be a delightful experience, but a few common mistakes can lead to less-than-ideal results.
- Overmixing the batter: This can make your cake dense instead of light and fluffy. Mix just until combined to keep it airy.
- Skipping the cooling time: If you frost the cake too soon, the frosting will melt. Allow your cakes to cool completely on wire racks before layering.
- Ignoring ingredient temperature: Using cold eggs or butter can affect mixing. Ensure they are at room temperature for better incorporation.
- Not measuring ingredients correctly: Improper measurements can lead to an imbalanced cake. Use a kitchen scale or proper measuring cups for accuracy.
- Neglecting oven preheating: Baking in an unheated oven can throw off cooking times and texture. Always preheat your oven before baking.
Storage & Reheating Instructions
Refrigerator Storage
- Store leftover cake in an airtight container for up to 5 days.
- If possible, separate layers with parchment paper to avoid sticking.
Freezing White Chocolate Raspberry Dream Cake – Sweet Easy Recipes Style
- Wrap individual slices in plastic wrap and aluminum foil for up to 3 months.
- Label containers with dates for easy tracking.
Reheating White Chocolate Raspberry Dream Cake – Sweet Easy Recipes Style
- Oven: Preheat to 350°F (175°C) and heat slices for about 10 minutes.
- Microwave: Heat individual slices on medium power for about 15-20 seconds until warm.
- Stovetop: Use a skillet over low heat with a lid, warming gently for about 5 minutes.
Frequently Asked Questions
Here are some common questions about making White Chocolate Raspberry Dream Cake that may help you out!
Can I use frozen raspberries in my White Chocolate Raspberry Dream Cake?
Yes, you can use frozen raspberries. Just toss them in flour before folding into the batter to prevent sinking.
How do I ensure my cake is moist?
Using buttermilk and sour cream helps create a moist texture. Don’t overbake your cake as well; check for doneness at the lower end of baking time.
What can I substitute for white chocolate chips?
You can use carob chips or even dairy-free chocolate chips if you’re looking for alternatives while maintaining flavor.
Can this cake be made gluten-free?
Yes, simply substitute all-purpose flour with a gluten-free baking blend that measures cup-for-cup.
Final Thoughts
The White Chocolate Raspberry Dream Cake is not just delicious; it’s also versatile! You can customize it by adding different fruits or using dark chocolate if preferred. It’s perfect for any occasion and sure to impress your guests. Give this sweet easy recipe a try, and enjoy every delightful bite!
White Chocolate Raspberry Dream Cake
Indulge in the delightful White Chocolate Raspberry Dream Cake – Sweet Easy Recipes Style, a perfect dessert that beautifully balances the creamy sweetness of white chocolate with the tart freshness of raspberries. This fluffy cake is ideal for any occasion, from intimate brunches to grand celebrations, impressing guests without requiring advanced baking skills. With its stunning presentation and light yet decadent flavor, every bite will leave you craving more. Whether you’re a novice or an experienced baker, this recipe is simple to follow and guarantees an impressive result.
- Prep Time: 20 minutes
- Cook Time: 30 minutes
- Total Time: 50 minutes
- Yield: Serves approximately 12 slices 1x
- Category: Dessert
- Method: Baking
- Cuisine: American
Ingredients
- 2 1/2 cups all-purpose flour
- 2 tsp baking powder
- 1/2 tsp baking soda
- 1/2 tsp salt
- 3/4 cup unsalted butter, softened
- 1 3/4 cups granulated sugar
- 4 large eggs
- 1 tsp vanilla extract
- 1 cup buttermilk
- 1/2 cup sour cream
- 1/2 cup melted white chocolate chips
- 1 1/2 cups raspberries (fresh or frozen)
- White chocolate shavings
- Fresh raspberries
Instructions
- Preheat your oven to 350°F (175°C) and prepare two 9-inch round cake pans by greasing and lining them with parchment paper.
- In a mixing bowl, whisk together flour, baking powder, baking soda, and salt; set aside.
- In another bowl, cream softened butter and sugar until light and fluffy. Add eggs one at a time, mixing well after each addition before stirring in vanilla extract.
- Mix in buttermilk, sour cream, and melted white chocolate until combined.
- Gradually add dry ingredients to wet ingredients until just combined; gently fold in raspberries.
- Divide batter between prepared pans and bake for 25–30 minutes or until a toothpick comes out clean.
- Allow cakes to cool for about 10 minutes before transferring them to a cooling rack.
Nutrition
- Serving Size: 1 slice (85g)
- Calories: 350
- Sugar: 25g
- Sodium: 180mg
- Fat: 18g
- Saturated Fat: 11g
- Unsaturated Fat: 6g
- Trans Fat: 0g
- Carbohydrates: 43g
- Fiber: 1g
- Protein: 5g
- Cholesterol: 75mg